How to Install SQL Server 2022 Release Candidate 0
SQL Server 2014’s end of support date is coming in less than two years: July 9, 2024. I know that sounds far-off right now, but consider the work you have to do between now and then:
- Pick a new version to migrate to
- Set up development SQL Servers for that new version
- Start developing & testing with it
- Get users to sign off that it’s working as expected
- Design your high availability & disaster recovery strategies for it (something I recommend folks revisit with each new release)
- Set up production/HA/DR SQL Servers
- Migrate over to the new servers
With that in mind, if you’re still running SQL Server 2014 today in production, now is the time to start moving your development servers over to the newer SQL Server version. I’ve got a post on which SQL Server version you should use, but if you’re just now starting a 2014 replacement plan, then you’re the kind of shop that doesn’t upgrade very often. (Which is cool! Change = risk.) In that case, I’d think about using SQL Server 2022 to get the longest lifespan you can out of your SQL Servers.
The first release candidate for Microsoft SQL Server 2022 is out, so let’s see what’s involved with installing it.
Start with a fresh, empty Windows VM for testing. Never install test/evaluation bits on your laptop or an existing SQL Server – it’s a recipe for trouble. Pre-release bits (and even release bits!) can cause side-by-side existence problems that you don’t want to have to waste time troubleshooting.
When the Windows VM is ready, download the installer here. When you run it, the Installation Center opens:

Click the Installation tab at left:

And for a standalone evaluation/development server, click the first line for a new standalone installation. (Most of the rest are just hyperlinks to go download other things that aren’t included in the SQL Server installer.)
The installer launches, and it’s time to choose your character:

Your choices:
- Evaluation Edition – just like Enterprise, but it times out after 180 days.
- Developer Edition – just like Enterprise, no time bomb, but isn’t allowed to be used for production purposes. Frankly, you’d be suicidal to use Evaluation Edition for production purposes too, since it has that time bomb. You wanna choose Developer because your evaluation period is probably going to extend beyond 180 days, and you don’t wanna have to worry about time bombs.
- Express Edition – only for tiny databases.
Choose your character – I’m going with Developer – and then hit next.

Let’s not pretend you’re going to read that, but I’ll point out one amusing section:

The $5 limit is because starting with SQL Server 2022, Microsoft is using Fiverr for development, testing, and support. The most they can get back from Fiverr for a refund is the $5 they spent on the contractor, so they gotta cap their losses. Otherwise, they’d go bankrupt from KB4538581 alone.
Accept the terms, and hit Next, and the installer will do some basic validation to make sure the VM is in a safe place:

In my case, the Windows Firewall warning is because Windows Firewall is enabled. If you click the Warning link, you’ll get instructions to set up an exclusion rule to let SQL Server traffic pass through the firewall. If you plan to test apps hitting this server, make a note that you’ll need to change the Windows Firewall settings later – but you can ignore this for now during setup, and circle back to it later.
When you hit Next, you get the first new screen:

As strange as it may seem, Microsoft is on a mission to get even more money out of you than just the SQL Server licensing costs. They want you to pay ongoing fees to use Azure services to manage your SQL Servers, regardless of where they live. If you want to burn money, buy candles.
Me personally, I can’t afford that and it’s irrelevant to my testing, so I’m going to uncheck that and click Next. Now, it’s time to pick features.

Install as few features as practical. Every box you check here has a performance cost. Many of them will consume CPU and memory even when they’re not being actively used.
The Features list in that screenshot looks like it’s cut off, like there’s more stuff below “Redistributable Features”. In RC0, there’s nothing else to see – there’s nothing below that. It’s a bug. What, you thought the product was ready? Buckle up, bud – it’s the first of many.
In that feature list, the only thing I’m going to check is Database Engine Services. I’m not a fan of SQL Server’s full text search, although I understand why people use it. Wanna check any other box on a production SQL Server? You should pause for a moment and reconsider the life choices that brought you here. Wanna check them just because it’s a dev box? Bad idea: if you make something available in development, then developers will come to rely on it, and then they’ll build code atop it, and need it in production. In terms of features, treat your dev servers like production.
After checking the Database Engine Services box, the Instance Root Directory option will light up:
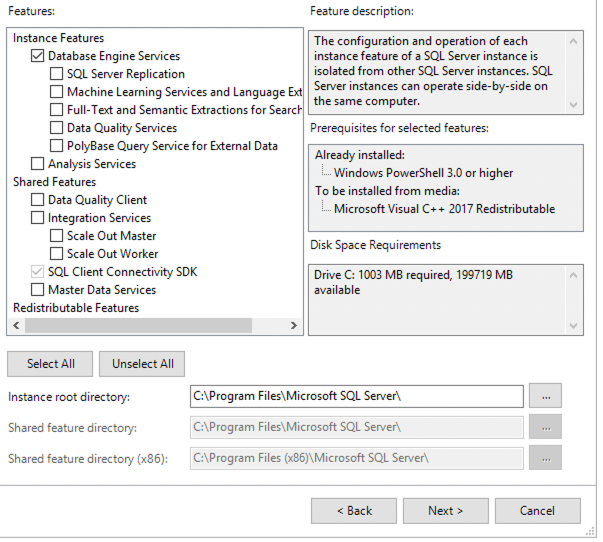
You can leave that one on the C drive – that’s fine. We’ll set the data & backup locations in subsequent steps. Click Next.

You can install multiple instances of SQL Server on the same Windows VM. I’m actually going to choose Named Instance because I need this for something else I’m doing, but you should leave it on Default.
When you click Next, there will be a significant pause before the next screen appears:

If you’re installing just for the purposes of testing 2022, you can stick with these service account names. Check the box for Grant Perform Volume Maintenance Tasks – that’s Instant File Initialization, which helps restore databases much more quickly. That’s important when you’re doing testing on new versions.
If your application needs case sensitivity or a different collation, click the Collation tab:

If you’re testing to replace an existing server, connect to that server with SQL Server Management Studio. Right-click on the server name, click Properties, and the existing server’s collation will be listed on the properties screen:

Back on your SQL Server 2022 setup, choose the collation that matches your existing production server, and click Next.

On the Server Configuration tab, the first decision you have to make is whether to allow SQL authentication. Over time, trends have gone back & forth as to whether this was a good idea. We were trying to stamp it out for a while, but then Azure SQL DB came out and it didn’t support Windows auth, so Microsoft had to backtrack the idea that SQL authentication was bad. These days, Azure SQL DB supports Windows auth (although it’s often a pain in the rear), so “experts” are all over the place as to whether or not you should have it on.
Most of the apps I interact with require it, so I’m going to set Mixed Mode, and then set a strong password for the SA account.
You have to take action in the “Specify SQL Server administrators” box. If you don’t, nobody’s going to be an admin on the instance, and you’re going to be in a world of hurt when you go to actually use this server. At bare minimum, add yourself by clicking the “Add Current User” button, which will take a few seconds. For real production purposes, you’ll want to use an Active Directory group consisting of database administrators.
Click the Data Directories tab, and you’ve got some work to do:

You have to take action here too. If you leave the “Data root directory” to be the OS boot drive, then sooner or later someone’s going to create or restore a database, pour a lot of data into it, and run the OS boot drive out of space. Choose a different volume for the database files to live.
I’m using a server with a Z drive, so after I type in “Z:\” in that top box and hit Tab, here’s what my screen looks like:

For my purposes, that’s fine. Click the TempDB tab:

If you have standard file sizes that you use, feel free to change those. For me, 8MB file size and 64MB autogrowth is awfully small. Even on dev/test servers, I go with 1024MB initial size and autogrowth sizes for both data and log files, like this:

Then click the MaxDOP tab:

SQL Server’s gotten a lot better over the last couple of releases at setting the right Maximum Degree of Parallelism (MaxDOP or MAXDOP, depending on where in that screenshot you look – consistency is the hobgoblin of little minds.)
Click the Memory tab:

Click the Recommended radio button, or else SQL Server will drain your memory dry. Just as a side note, Max Server Memory doesn’t actually mean the maximum – there are things SQL Server will use memory above and beyond that maximum. We’re just setting a ceiling to make sure things don’t go absolutely crazy.
Don’t click the FILESTREAM tab. I know it’s in all caps, which means Microsoft is yelling at you, imploring you to use SQL Server as a really expensive file server. It’s a bad idea. Save your lunch money, and put files where they belong.
Click Next, and decision time is over – just click Install:

After installation finishes, you can use SQL Server Management Studio to connect. You don’t have to download a new version – SSMS 19 isn’t required.
Free, 3× a week
Get my new posts by email
Three posts a week, plus a Monday roundup of the best database news from around the web.