
How to Set Up Your Own Mastering Class VM
When you buy one of my Live Class Season Passes, you can save a lot of money by building your own VM to follow along with the labs. Or, you might just wanna re-run the labs later to see if you can do a better job, or if you’re still mastering a concept.
You’re going to need:
- A server
- The Stack Overflow database
- The indexes & scripts set up
- Then ideally, back the database up, and set up an Agent job to rapidly restore the database between labs
- SQLQueryStress
Let’s talk through each piece.
Building a SQL Server
To get a rough idea of how much hardware to use, let’s look at the AWS EC2 VMs I give the class students:
- Mastering Index Tuning & Mastering Query Tuning use an i3.xlarge: 4 cores, 30GB RAM, local NVMe SSD storage
- Mastering Server Tuning uses an i3.2xlarge: 8 cores, 61GB RAM, local NVMe storage – we use more cores & RAM here because we run heavier stress tests, since we’re doing server-level discussions
Each server needs at least 500GB local SSD space to deal with the 350GB Stack Overflow database, index creation space, TempDB, backups, and restores. It needs to be fast storage, too: for a rough idea, you’ll need to be able to restore the ~350GB backup in 15 minutes or less. (I’m just using restore speed as one example here – you’ll be doing lots of storage-intensive tasks, like creating indexes on large tables.)
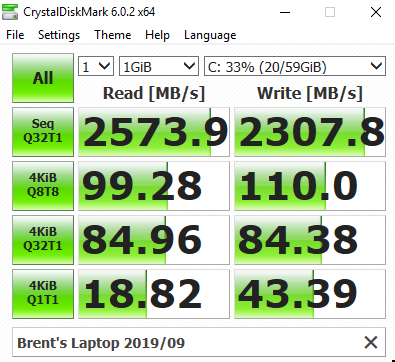 If you want to check your storage speed before downloading the Stack database, run a test with CrystalDiskMark. You want at least 1,000 MB/sec for sequential reads and writes. As an example, my laptop’s SSD speeds are shown at right, and it would be fine for the labs.
Can you get by with less hardware? Sure, but of course your performance will be different than what we’re seeing in class. I actually don’t think that’s a bad thing – every server out there is different – but just be aware that it’ll pose additional challenges for you if you try something like 4 cores, 8GB RAM. Your index creations will be terribly slow, and you probably won’t be able to keep up in class.
Can you use more hardware? Yep, and as long as you’re not caching the entire database in RAM, you’ll probably still have the same basic challenges that we tackle in all of the classes.
After building the server, install:
- SQL Server 2017 or 2019 Developer Edition (Express Edition won’t work)
- The latest Cumulative Update
- The most recent SQL Server Management Studio (and it really does have to be the most recent one)
Getting the Stack Overflow database
Download the 2018-06 version of the Stack Overflow database: 38GB torrent (magnet.) If you’re not familiar with BitTorrent, here are detailed instructions, but just make sure to get the Stack version mentioned earlier in this paragraph – it’s important so you reproduce demos the same way. Your company may block BitTorrent – many do – but it’s the most efficient way to get a >300GB database out there. There aren’t a lot of file hosts willing to share a file that big, heh. You may need to download it from home.
When you extract it, it’ll expand to a ~304GB SQL Server database that you can attach. There are other smaller versions of the database too, but be aware that you’ll get radically different query plans, and some of the demos won’t work the same way since we’re querying for specific date ranges.
It ships in SQL 2008 compatible format, but you usually wanna learn on the most recent Cardinality Estimator (CE). To set that, in SSMS, right-click on the database, go into Options, and change Compatibility Level to the most current version you’re on – but not SQL Server 2019, which behaves quite differently – hold off on that compat level until SQL Server 2019 is released. I’m updating the classes with more modules for SQL Server 2019’s behavior, but if you try that now, you’re going to get wildly unpredictable behavior compared to the rest of your classmates.
Setting Up the Stored Procs and Indexes
We use the First Responder Kit scripts for performance analysis, and we use the below procs to help the demos along. Create these in the Stack Overflow database:
|
1 2 3 4 5 6 7 8 9 10 11 12 13 14 15 16 17 18 19 20 21 22 23 24 25 26 27 28 29 30 31 32 33 34 35 36 37 38 39 40 41 42 43 44 45 46 47 48 49 50 51 52 53 54 55 56 57 58 59 60 61 62 63 64 65 66 67 68 69 70 71 72 73 74 75 76 77 78 79 80 81 82 83 84 85 86 87 88 89 90 91 |
CREATE OR ALTER PROCEDURE [dbo].[DropIndexes] @SchemaName NVARCHAR(255) = 'dbo', @TableName NVARCHAR(255) = NULL, @WhatToDrop VARCHAR(10) = 'Everything', @ExceptIndexNames NVARCHAR(MAX) = NULL AS BEGIN SET NOCOUNT ON; CREATE TABLE #commands (ID INT IDENTITY(1,1) PRIMARY KEY CLUSTERED, Command NVARCHAR(2000)); CREATE TABLE #ExceptIndexNames (IndexName NVARCHAR(1000)); INSERT INTO #ExceptIndexNames(IndexName) SELECT UPPER(TRIM(value)) FROM string_split(@ExceptIndexNames,','); DECLARE @CurrentCommand NVARCHAR(2000); IF ( UPPER(@WhatToDrop) LIKE 'C%' OR UPPER(@WhatToDrop) LIKE 'E%' ) BEGIN INSERT INTO #commands (Command) SELECT N'ALTER TABLE ' + QUOTENAME(SCHEMA_NAME(o.schema_id)) + N'.' + QUOTENAME(OBJECT_NAME(o.parent_object_id)) + N' DROP CONSTRAINT ' + QUOTENAME(o.name) + N';' FROM sys.objects AS o WHERE o.type IN ('C', 'F', 'UQ') AND SCHEMA_NAME(o.schema_id) = COALESCE(@SchemaName, SCHEMA_NAME(o.schema_id)) AND OBJECT_NAME(o.parent_object_id) = COALESCE(@TableName, OBJECT_NAME(o.parent_object_id)) AND UPPER(o.name) NOT IN (SELECT IndexName FROM #ExceptIndexNames); END; IF ( UPPER(@WhatToDrop) LIKE 'I%' OR UPPER(@WhatToDrop) LIKE 'E%' ) BEGIN INSERT INTO #commands (Command) SELECT 'DROP INDEX ' + QUOTENAME(i.name) + ' ON ' + QUOTENAME(SCHEMA_NAME(t.schema_id)) + '.' + t.name + ';' FROM sys.tables t INNER JOIN sys.indexes i ON t.object_id = i.object_id WHERE i.type = 2 AND SCHEMA_NAME(t.schema_id) = COALESCE(@SchemaName, SCHEMA_NAME(t.schema_id)) AND t.name = COALESCE(@TableName, t.name) AND UPPER(i.name) NOT IN (SELECT IndexName FROM #ExceptIndexNames); INSERT INTO #commands (Command) SELECT 'DROP STATISTICS ' + QUOTENAME(SCHEMA_NAME(t.schema_id)) + '.' + QUOTENAME(OBJECT_NAME(s.object_id)) + '.' + QUOTENAME(s.name) + ';' FROM sys.stats AS s INNER JOIN sys.tables AS t ON s.object_id = t.object_id WHERE NOT EXISTS (SELECT * FROM sys.indexes AS i WHERE i.name = s.name) AND SCHEMA_NAME(t.schema_id) = COALESCE(@SchemaName, SCHEMA_NAME(t.schema_id)) AND t.name = COALESCE(@TableName, t.name) AND OBJECT_NAME(s.object_id) NOT LIKE 'sys%'; END; DECLARE result_cursor CURSOR FOR SELECT Command FROM #commands; OPEN result_cursor; FETCH NEXT FROM result_cursor INTO @CurrentCommand; WHILE @@FETCH_STATUS = 0 BEGIN PRINT @CurrentCommand; EXEC(@CurrentCommand); FETCH NEXT FROM result_cursor INTO @CurrentCommand; END; --end loop --clean up CLOSE result_cursor; DEALLOCATE result_cursor; END; GO |
Don’t install that in production, bucko.
Next, run the index creation scripts below. It’s going to take a while, depending on how fast your lab’s storage is. After creating these indexes, we’ll take a backup of the database so that you can restore it each time to set back to a known starting point – rather than creating the indexes every time you restart labs, which can take tens of minutes.
|
1 2 3 4 5 6 7 8 9 10 11 12 13 14 15 16 17 18 19 20 21 22 23 24 25 26 27 28 29 30 31 32 33 34 35 36 37 38 39 40 41 42 43 44 45 46 47 48 49 50 51 52 53 54 55 56 57 58 59 60 61 62 63 64 65 66 67 68 69 70 71 72 73 74 75 76 77 78 79 80 81 82 83 84 85 86 |
IF NOT EXISTS(SELECT * FROM sys.indexes WHERE object_id = OBJECT_ID('dbo.Badges') AND name = 'IX_Id') CREATE INDEX [IX_Id] ON [dbo].[Badges] ( [Id] ) WITH (FILLFACTOR=100); IF NOT EXISTS(SELECT * FROM sys.indexes WHERE object_id = OBJECT_ID('dbo.Badges') AND name = 'IX_UserId') CREATE INDEX [IX_UserId] ON [dbo].[Badges] ( [UserId] ) WITH (FILLFACTOR=100); IF NOT EXISTS(SELECT * FROM sys.indexes WHERE object_id = OBJECT_ID('dbo.Badges') AND name = '_dta_index_Badges_5_2105058535__K3_K2_K4') CREATE INDEX [_dta_index_Badges_5_2105058535__K3_K2_K4] ON [dbo].[Badges] ( [UserId], [Name], [Date] ) WITH (FILLFACTOR=100); GO IF NOT EXISTS(SELECT * FROM sys.indexes WHERE object_id = OBJECT_ID('dbo.Comments') AND name = 'IX_Id') CREATE INDEX [IX_Id] ON [dbo].[Comments] ( [Id] )WITH (FILLFACTOR=100); IF NOT EXISTS(SELECT * FROM sys.indexes WHERE object_id = OBJECT_ID('dbo.Comments') AND name = 'IX_PostId') CREATE INDEX [IX_PostId] ON [dbo].[Comments] ( [PostId] )WITH (FILLFACTOR=100); IF NOT EXISTS(SELECT * FROM sys.indexes WHERE object_id = OBJECT_ID('dbo.Comments') AND name = 'IX_UserId') CREATE INDEX [IX_UserId] ON [dbo].[Comments] ( [UserId] )WITH (FILLFACTOR=100); IF NOT EXISTS(SELECT * FROM sys.indexes WHERE object_id = OBJECT_ID('dbo.Comments') AND name = '_dta_index_Comments_5_2137058649__K6_K2_K3') CREATE INDEX [_dta_index_Comments_5_2137058649__K6_K2_K3] ON [dbo].[Comments] ( [UserId], [CreationDate], [PostId] )WITH (FILLFACTOR=100); GO IF NOT EXISTS(SELECT * FROM sys.indexes WHERE object_id = OBJECT_ID('dbo.PostLinks') AND name = 'IX_LinkTypeId') CREATE INDEX [IX_LinkTypeId] ON [dbo].[PostLinks] ( [LinkTypeId] )WITH (FILLFACTOR=100); IF NOT EXISTS(SELECT * FROM sys.indexes WHERE object_id = OBJECT_ID('dbo.PostLinks') AND name = 'IX_PostId') CREATE INDEX [IX_PostId] ON [dbo].[PostLinks] ( [PostId] )WITH (FILLFACTOR=100); IF NOT EXISTS(SELECT * FROM sys.indexes WHERE object_id = OBJECT_ID('dbo.PostLinks') AND name = 'IX_RelatedPostId') CREATE INDEX [IX_RelatedPostId] ON [dbo].[PostLinks] ( [RelatedPostId] )WITH (FILLFACTOR=100); GO IF NOT EXISTS(SELECT * FROM sys.indexes WHERE object_id = OBJECT_ID('dbo.PostHistory') AND name = 'IX_PostId_PostHistoryTypeId_CreationDate') CREATE INDEX IX_PostId_PostHistoryTypeId_CreationDate ON dbo.PostHistory(PostId, PostHistoryTypeId, CreationDate); GO IF NOT EXISTS(SELECT * FROM sys.indexes WHERE object_id = OBJECT_ID('dbo.Posts') AND name = '_dta_index_Posts_5_85575343__K2') CREATE INDEX [_dta_index_Posts_5_85575343__K2] ON [dbo].[Posts] ( [AcceptedAnswerId] )WITH (FILLFACTOR=100); IF NOT EXISTS(SELECT * FROM sys.indexes WHERE object_id = OBJECT_ID('dbo.Posts') AND name = 'IX_AcceptedAnswerId') CREATE INDEX [IX_AcceptedAnswerId] ON [dbo].[Posts] ( [AcceptedAnswerId] )WITH (FILLFACTOR=100); IF NOT EXISTS(SELECT * FROM sys.indexes WHERE object_id = OBJECT_ID('dbo.Posts') AND name = '_dta_index_Posts_5_85575343__K2_K14') CREATE INDEX [_dta_index_Posts_5_85575343__K2_K14] ON [dbo].[Posts] ( [AcceptedAnswerId], [OwnerUserId] )WITH (FILLFACTOR=100); IF NOT EXISTS(SELECT * FROM sys.indexes WHERE object_id = OBJECT_ID('dbo.Posts') AND name = '_dta_index_Posts_5_85575343__K8') CREATE INDEX [_dta_index_Posts_5_85575343__K8] ON [dbo].[Posts] ( [CreationDate] )WITH (FILLFACTOR=100); IF NOT EXISTS(SELECT * FROM sys.indexes WHERE object_id = OBJECT_ID('dbo.Posts') AND name = 'IX_LastActivityDate_Includes') CREATE INDEX [IX_LastActivityDate_Includes] ON [dbo].[Posts] ( [LastActivityDate] ) INCLUDE ( [ViewCount])WITH (FILLFACTOR=100); IF NOT EXISTS(SELECT * FROM sys.indexes WHERE object_id = OBJECT_ID('dbo.Posts') AND name = 'IX_LastEditorUserId') CREATE INDEX [IX_LastEditorUserId] ON [dbo].[Posts] ( [LastEditorUserId] )WITH (FILLFACTOR=100); IF NOT EXISTS(SELECT * FROM sys.indexes WHERE object_id = OBJECT_ID('dbo.Posts') AND name = 'IX_OwnerUserId') CREATE INDEX [IX_OwnerUserId] ON [dbo].[Posts] ( [OwnerUserId] )WITH (FILLFACTOR=100); IF NOT EXISTS(SELECT * FROM sys.indexes WHERE object_id = OBJECT_ID('dbo.Posts') AND name = '_dta_index_Posts_5_85575343__K14_K16_K7_K1_K2_17') CREATE INDEX [_dta_index_Posts_5_85575343__K14_K16_K7_K1_K2_17] ON [dbo].[Posts] ( [OwnerUserId], [PostTypeId], [CommunityOwnedDate], [Id], [AcceptedAnswerId] ) INCLUDE ( [Score])WITH (FILLFACTOR=100); IF NOT EXISTS(SELECT * FROM sys.indexes WHERE object_id = OBJECT_ID('dbo.Posts') AND name = '_dta_index_Posts_5_85575343__K14_K16_K1_K2') CREATE INDEX [_dta_index_Posts_5_85575343__K14_K16_K1_K2] ON [dbo].[Posts] ( [OwnerUserId], [PostTypeId], [Id], [AcceptedAnswerId] )WITH (FILLFACTOR=100); IF NOT EXISTS(SELECT * FROM sys.indexes WHERE object_id = OBJECT_ID('dbo.Posts') AND name = 'IX_ParentId') CREATE INDEX [IX_ParentId] ON [dbo].[Posts] ( [ParentId] )WITH (FILLFACTOR=100); IF NOT EXISTS(SELECT * FROM sys.indexes WHERE object_id = OBJECT_ID('dbo.Posts') AND name = 'IX_PostTypeId') CREATE INDEX [IX_PostTypeId] ON [dbo].[Posts] ( [PostTypeId] )WITH (FILLFACTOR=100); IF NOT EXISTS(SELECT * FROM sys.indexes WHERE object_id = OBJECT_ID('dbo.Posts') AND name = '_dta_index_Posts_5_85575343__K16_K7_K5_K14_17') CREATE INDEX [_dta_index_Posts_5_85575343__K16_K7_K5_K14_17] ON [dbo].[Posts] ( [PostTypeId], [CommunityOwnedDate], [ClosedDate], [OwnerUserId] ) INCLUDE ( [Score])WITH (FILLFACTOR=100); IF NOT EXISTS(SELECT * FROM sys.indexes WHERE object_id = OBJECT_ID('dbo.Posts') AND name = 'IX_ViewCount_Includes') CREATE INDEX [IX_ViewCount_Includes] ON [dbo].[Posts] ( [ViewCount] ) INCLUDE ( [LastActivityDate])WITH (FILLFACTOR=100); GO IF NOT EXISTS(SELECT * FROM sys.indexes WHERE object_id = OBJECT_ID('dbo.PostTypes') AND name = 'IX2') CREATE INDEX [IX2] ON [dbo].[PostTypes] ( [Id] )WITH (FILLFACTOR=100); IF NOT EXISTS(SELECT * FROM sys.indexes WHERE object_id = OBJECT_ID('dbo.PostTypes') AND name = 'IX4') CREATE INDEX [IX4] ON [dbo].[PostTypes] ( [Id], [Type] )WITH (FILLFACTOR=100); IF NOT EXISTS(SELECT * FROM sys.indexes WHERE object_id = OBJECT_ID('dbo.PostTypes') AND name = 'IX1') CREATE INDEX [IX1] ON [dbo].[PostTypes] ( [Type] )WITH (FILLFACTOR=100); IF NOT EXISTS(SELECT * FROM sys.indexes WHERE object_id = OBJECT_ID('dbo.PostTypes') AND name = 'IX3') CREATE INDEX [IX3] ON [dbo].[PostTypes] ( [Type], [Id] )WITH (FILLFACTOR=100); IF NOT EXISTS(SELECT * FROM sys.indexes WHERE object_id = OBJECT_ID('dbo.PostTypes') AND name = 'IX_Type') CREATE INDEX [IX_Type] ON [dbo].[PostTypes] ( [Type], [Id] )WITH (FILLFACTOR=100); GO IF NOT EXISTS(SELECT * FROM sys.indexes WHERE object_id = OBJECT_ID('dbo.Users') AND name = '_dta_index_Users_5_149575571__K7_K10_K1_5') CREATE INDEX [_dta_index_Users_5_149575571__K7_K10_K1_5] ON [dbo].[Users] ( [EmailHash], [Reputation], [Id] ) INCLUDE ( [DisplayName])WITH (FILLFACTOR=100); IF NOT EXISTS(SELECT * FROM sys.indexes WHERE object_id = OBJECT_ID('dbo.Users') AND name = 'IX_LastAccessDate') CREATE INDEX [IX_LastAccessDate] ON [dbo].[Users] ( [LastAccessDate] )WITH (FILLFACTOR=100); IF NOT EXISTS(SELECT * FROM sys.indexes WHERE object_id = OBJECT_ID('dbo.Users') AND name = 'IX_LastAccessDate_DisplayName_Reputation') CREATE INDEX [IX_LastAccessDate_DisplayName_Reputation] ON [dbo].[Users] ( [LastAccessDate], [DisplayName], [Reputation] )WITH (FILLFACTOR=100); IF NOT EXISTS(SELECT * FROM sys.indexes WHERE object_id = OBJECT_ID('dbo.Users') AND name = '<Name of Missing Index, sysname,>') CREATE INDEX [<Name of Missing Index, sysname,>] ON [dbo].[Users] ( [Reputation] ) INCLUDE ( [Views])WITH (FILLFACTOR=100); IF NOT EXISTS(SELECT * FROM sys.indexes WHERE object_id = OBJECT_ID('dbo.Users') AND name = 'IX_Reputation_Includes') CREATE INDEX [IX_Reputation_Includes] ON [dbo].[Users] ( [Reputation] ) INCLUDE ( [Views])WITH (FILLFACTOR=100); IF NOT EXISTS(SELECT * FROM sys.indexes WHERE object_id = OBJECT_ID('dbo.Users') AND name = 'IX_Views_Includes') CREATE INDEX [IX_Views_Includes] ON [dbo].[Users] ( [Views] ) INCLUDE ( [Reputation])WITH (FILLFACTOR=100); GO IF NOT EXISTS(SELECT * FROM sys.indexes WHERE object_id = OBJECT_ID('dbo.Votes') AND name = 'IX_PostId_UserId') CREATE INDEX [IX_PostId_UserId] ON [dbo].[Votes] ( [PostId], [UserId] ) WITH (FILLFACTOR=100); IF NOT EXISTS(SELECT * FROM sys.indexes WHERE object_id = OBJECT_ID('dbo.Votes') AND name = 'IX_UserId') CREATE INDEX [IX_UserId] ON [dbo].[Votes] ( [UserId] ) WITH (FILLFACTOR=100); IF NOT EXISTS(SELECT * FROM sys.indexes WHERE object_id = OBJECT_ID('dbo.Votes') AND name = '_dta_index_Votes_5_181575685__K3_K2_K5') CREATE INDEX [_dta_index_Votes_5_181575685__K3_K2_K5] ON [dbo].[Votes] ( [UserId], [PostId], [VoteTypeId] ) WITH (FILLFACTOR=100); IF NOT EXISTS(SELECT * FROM sys.indexes WHERE object_id = OBJECT_ID('dbo.Votes') AND name = 'IX_VoteTypeId') CREATE INDEX [IX_VoteTypeId] ON [dbo].[Votes] ( [VoteTypeId] ) WITH (FILLFACTOR=100); GO |
Back It Up and Set Up a Restore Job
During class, between each lab, the students restore their database to this starting point. For sheer performance, you want to run the backup across 4 files – SQL Server backups & restores can actually go faster when you stripe them across more files, even when writing to the same storage.
Then, set up an Agent job to restore them. Here’s the script I use – just modify the file path locations for your backups. Note that mine also has a step to set Cost Threshold for Parallelism and MAXDOP back to normal defaults for the VM we’re working with in the cloud.
In my example below, I’m doing my restores from E:\MSSQL\BACKUP – you may need to modify your backup path and file names.
|
1 2 3 4 5 6 7 8 9 10 11 12 13 14 15 16 17 18 19 20 21 22 23 24 25 26 27 28 29 30 31 32 33 34 35 36 37 38 39 40 41 42 43 44 45 46 47 48 49 50 51 52 53 54 55 56 57 58 59 60 61 62 63 64 65 66 67 68 69 70 |
USE [msdb] GO BEGIN TRANSACTION DECLARE @ReturnCode INT SELECT @ReturnCode = 0 /****** Object: JobCategory [[Uncategorized (Local)]] Script Date: 4/15/2019 10:33:33 AM ******/ IF NOT EXISTS (SELECT name FROM msdb.dbo.syscategories WHERE name=N'[Uncategorized (Local)]' AND category_class=1) BEGIN EXEC @ReturnCode = msdb.dbo.sp_add_category @class=N'JOB', @type=N'LOCAL', @name=N'[Uncategorized (Local)]' IF (@@ERROR <> 0 OR @ReturnCode <> 0) GOTO QuitWithRollback END DECLARE @jobId BINARY(16) EXEC @ReturnCode = msdb.dbo.sp_add_job @job_name=N'Restore StackOverflow', @enabled=1, @notify_level_eventlog=0, @notify_level_email=0, @notify_level_netsend=0, @notify_level_page=0, @delete_level=0, @description=N'No description available.', @category_name=N'[Uncategorized (Local)]', @owner_login_name=N'sa', @job_id = @jobId OUTPUT IF (@@ERROR <> 0 OR @ReturnCode <> 0) GOTO QuitWithRollback /****** Object: Step [Restore StackOverflow] Script Date: 4/15/2019 10:33:33 AM ******/ EXEC @ReturnCode = msdb.dbo.sp_add_jobstep @job_id=@jobId, @step_name=N'Restore StackOverflow', @step_id=1, @cmdexec_success_code=0, @on_success_action=1, @on_success_step_id=0, @on_fail_action=2, @on_fail_step_id=0, @retry_attempts=0, @retry_interval=0, @os_run_priority=0, @subsystem=N'TSQL', @command=N'EXEC sys.sp_configure N''cost threshold for parallelism'', N''50'' EXEC sys.sp_configure N''max degree of parallelism'', N''0'' RECONFIGURE IF EXISTS(SELECT * FROM sys.databases WHERE name = ''StackOverflow'' AND state_desc = ''RECOVERY_PENDING'') DROP DATABASE [StackOverflow]; IF EXISTS(SELECT * FROM sys.databases WHERE name = ''StackOverflow'') ALTER DATABASE [StackOverflow] SET SINGLE_USER WITH ROLLBACK IMMEDIATE; RESTORE DATABASE [StackOverflow] FROM DISK = N''E:\MSSQL\BACKUP\StackOverflow_1of4.bak'', DISK = N''E:\MSSQL\BACKUP\StackOverflow_2of4.bak'', DISK = N''E:\MSSQL\BACKUP\StackOverflow_3of4.bak'', DISK = N''E:\MSSQL\BACKUP\StackOverflow_4of4.bak'' WITH FILE = 1, NOUNLOAD, REPLACE, STATS = 5 ALTER DATABASE [StackOverflow] SET COMPATIBILITY_LEVEL = 140; ', @database_name=N'master', @flags=0 IF (@@ERROR <> 0 OR @ReturnCode <> 0) GOTO QuitWithRollback EXEC @ReturnCode = msdb.dbo.sp_update_job @job_id = @jobId, @start_step_id = 1 IF (@@ERROR <> 0 OR @ReturnCode <> 0) GOTO QuitWithRollback EXEC @ReturnCode = msdb.dbo.sp_add_jobserver @job_id = @jobId, @server_name = N'(local)' IF (@@ERROR <> 0 OR @ReturnCode <> 0) GOTO QuitWithRollback COMMIT TRANSACTION GOTO EndSave QuitWithRollback: IF (@@TRANCOUNT > 0) ROLLBACK TRANSACTION EndSave: GO |
Test your restore job to get an idea of how long it’ll take – if it takes more than 15 minutes, you probably want to use a faster VM to be able to keep up in class. If the restore takes, say, 20-30 minutes, you’re going to have a tough time keeping up when you’re doing storage-intensive things like creating indexes.
SQLQueryStress for load testing
SQLQueryStress is an easy, free, open source load testing utility. Download the latest version (zip), and extract it to a folder. You don’t have to run a setup or anything – it’s just a single .exe file that you can run whenever you want to do a load test.
Then, download my load test files and extract those to the same folder. Your folder will end up looking like this:

And that’s it! See you in class, and hope you have as much fun as Vadim had.

12 Comments. Leave new
How about running a docker of SQL Server? It makes jumping between versions for demos and tests so easy!
Alex – we don’t jump between versions for the demos, so it’s kinda irrelevant.
Sure, but one day maybe you’ll want to update to a newer CU/version, and maybe compare between them, etc. 🙂
Nah, that’s not even remotely on the radar.
I get that you’re a Docker fan, but here, that’s a solution looking for a problem. 😉
It’s funny, as I wasn’t a docker fan until really recently, when I did have to change versions for an open-source project I’m helping out with. Directly installing and upgrading versions was such a pain, not to mention trying to clean them up to switch back. Then I tried docker and was instantly converted, heh (admittedly, after some pain figuring out the initial setup). I think that for any test/demo server it’s much easier to set up, but of course it’s definitely not a must 🙂
Exactly – the pain of the setup means that it’s worse, not better, for solutions when you need to get hundreds of training students ready. Docker is the exact opposite of what I need here. I’m not trying to teach them Docker, so using containers would actually cost me time and money.
It kills me when I hear the Docker and K8s crowd say things like, “it’s super easy once you get past setting it up!” Yeah, okay, great. Real helpful.
Well, the pain of setup is due to lack of knowledge, not the setup itself (talking docker and not K8 here). Once you have a working command, and especially on Linux, you basically run one command to install docker, and another command to get and run the latest version of the DB you need, and that’s it.
But yeah, in this case I get what you’re saying, it’s probably simpler with a regular installation.
“Once you have a working command” sums it up pretty well.
Reminds me of the old Steve Martin joke: “if you want to be a millionaire, it’s really easy. First, get a million dollars.”
Hehehe good point. That working command is reusable and can be shared to everyone who needs it without the need for everyone to come up with a million dollars, though 😛
…Bob’s bank. I got your money. White suit, right-hand pocket.
not the same bit or album, but that bit from comedy is not pretty reminded me of the one from wild and crazy guy.
Thank you for the detailed instructions!
I’m making use of the recommended AWS EC2 VM (second time round it was easier than the first time I attempted it…old dog learning new tricks, woof, it seems!)
I’m gearing up for Monday’s class. Tonight is my second round of setting up…
Mental note to myself and maybe anyone else visiting this page: EPHEMERAL storage is a very beautiful word to say: once, you’ve shut down your EC2 instance: everything you’ve got stored there goes whoosh gone baby gone.
This time round:
1 Restore the database
2 Run the scripts above [make a pot of coffee and consume while this completes]
3 Backup the database
4-5-6…Zip the backup | Move the backup to C Drive |Then and only then: shut down the instance.