Production DBA
How to Install Azure Data Studio to Work with SQL Server
Download Azure Data Studio on your desktop. Do this on your desktop, not the SQL Server itself. You always want to run management tools from your own machine to reduce the overhead on the SQL Server itself. After it downloads, install it – just accept the defaults. During the installation process, it may ask:

You don’t need to register Azure Data Studio. You can leave the checkbox enabled for Add to PATH (and no, I have no idea why PATH is CAPITALIZED), but you don’t need to restart immediately for the purposes of this blog post, nor do you need to do it quickly.
Launch Azure Data Studio. After the launch, it may ask if you want to enable preview features, and if so, click Yes.
Open the Extensions pane. Click View, Extensions. This is where you can enable all kinds of cool add-ons that give Azure Data Studio more power. Today, we’re looking for a power-up that will give us the ability to manage SQL Server Agent jobs, so type in SQL Server Agent in the search box:
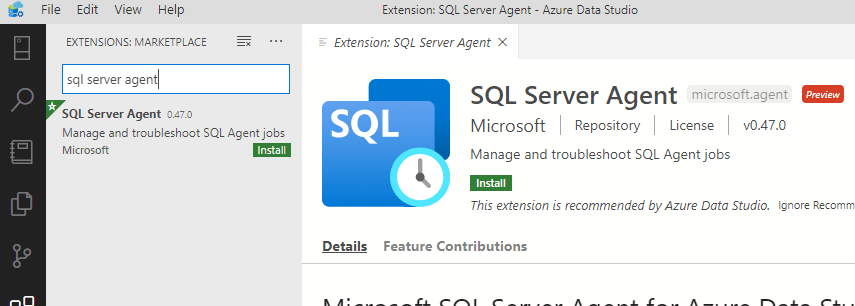
And click the Install button. Which button? It doesn’t matter. Microsoft just likes to make it easier for you by spraying identically named buttons all over the screen. Relax. It’s not like these extra buttons cost you extra. This is all free to you. That’s the beauty of open source.
Now, you’re ready to connect to a SQL Server.
 Click the Connections button up at the top left. It looks like a game of Qix. I would say that it looks like a physical server, but it’s been so long since you’ve seen a physical server that the comparison is about as relevant as a Nintendo game.
You can also access the Connections window by clicking Control-Shift-D.
Click on the New Connection button to add a connection to your SQL Server, and then fill in the details. For example, here’s my server’s connection details:

Server – the DNS name or IP address where your SQL Server answers connection requests. This is usually the same as the server name itself, but if you have fancier setups like named instances or non-default port numbers, you’ll need to specify those here.
Authentication type – probably Windows, try that first. If that fails, you either don’t have access to the server, or it’s configured with SQL authentication.
Database – leave at Default. If you pick a specific database, then you won’t be able to see the list of databases after you connect.
Server group – leave at default.
Name – this is a user-friendly name just for your own purposes. For me, I’m calling mine “Production” because sometimes my servers have long & complicated names, and it’s easier to tell at a glance which one I’m connected to. If you have lots of servers, you wouldn’t want to use “Production” – you might want to use, say, “Production – Accounting” to clarify which server you’re on.
If everything went well, you’ll see a list of databases like this:

If things did NOT go well, and you need to get help, here are a few places to get help:
- The #AzureDataStudio channel in the community Slack – go here to get an invite if you’re not in it yet
- The #SQLhelp channel in the community Slack
- The #SQLhelp hash tag on Twitter
Just keep in mind that the folks on the other side of the screen are volunteers, so say please and thank you a lot when they help you out with your challenges.
Free, 3× a week
Get my new posts by email
Three posts a week, plus a Monday roundup of the best database news from around the web.