My computer has to be nearly silent because I use it to record video podcasts about SQL Server. I can’t have a big whirring fan noise in the background while I’m recording. Normally I use a Macbook Pro, which is completely silent, but as part of my Hackintosh experiment I tried to build a silent PC.
I didn’t want to sacrifice speed in the name of silence: no mini-ITX, underpowered computer for me. I used a Core 2 Duo 3GHz dual-core CPU, 8gb of memory, and five SATA drives (four in a RAID 10, one for backups).
Picking the Best Quiet PC Parts

I chose an Antec Mini P180 case (Antec – Newegg – Review) because:
- It handles five 3.5″ internal drives (I plan on doing a big RAID)
- The 7200 RPM drives are going to need some silencing
- It’s kitted out for silence – rubber grommets for drives, quiet low-RPM fans, 3-ply sidewalls, etc
- I knew I’d be taking pictures of it for my web site (and thus, expensing the project. Woohoo, business tax deductions!)
- It’s a little smaller than typical noise-reducing cases
- Because I like nice stuff. Seriously, is that so wrong? This whole project cost me under $800 out of pocket. Who cares if I splurged $200 on a case and power supply? If I wanted an ugly computer I’d go buy one.
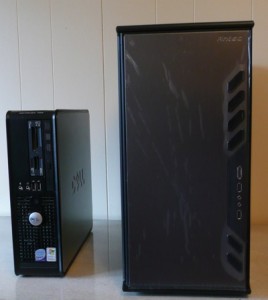
In the picture here, the Antec still has a plastic sheet covering its smooth charcoal exterior. No, I’m not that annoying relative who leaves plastic covers on their furniture: I did take the plastic off once I’d gotten everything set up.
For power, I picked up an Antec BP550 (Antec – Newegg) because, uh, well, it was the Newegg deal of the day for almost half off. It wasn’t my first choice, but it looked pretty quiet. It’s no longer on sale, so if you’re going to choose from scratch, check out Anandtech’s reviews of 300w-450w power supplies and 500w-550w power supplies. They do a good job of evaluating power supplies by noise and efficiency.
To cool the CPU, I was originally just going to use the stock heatsink/fan that comes with the Intel CPU. The stock heatsink/fan combo is currently on FrostyTech’s Top 10 Heatsinks list in the low-noise category. However, I’m one of the clumsiest people on the earth, and in the process of installing the CPU fan, the crappy pushpin mounting system broke on me. I get the feeling the pushpin mounting system was designed by an accountant to save costs. No engineer in his right mind would design this setup. Nobody had a set of replacement pins in stock locally, so as long as I was placing an order anyway….
I got the Xigmatek HDT-S1283 (Xigmatek – Newegg – Review) because it struck the best balance between several factors:
- Good cooling – reviews show that it does a great job of shedding heat on overclocked CPUs. I’m not going to overclock (although I will do it briefly to see how it performs.)
- Low noise – because the heatsink alone cools well, it doesn’t require a fast fan.
- Tight space – some CPU heatsinks out there are absolutely massive. Check out a picture of FrostyTech’s #1 rated low-noise heatsink.
- Low price – it’s under $40. If you’re like me, that sounds like a heck of a lot of money for a heatsink and fan, but in the overclocking world, this is still pretty cheap.
I also paid a little extra for a screw-in mounting kit instead of the crappy pushpins. Be aware that a screw-in mounting kit, while more secure for big heavy heat sinks, bolts onto both sides of the motherboard. If your motherboard is already in your PC case, you’ll need to remove it completely in order to use a screw-in heatsink mounting kit.
Another wise investment might be replacing the Xigmatek’s included fan with a quieter one, but Antec threw in an extra 120mm quiet fan for my case, so I used that one. (They don’t include an extra fan with all cases.)

Putting the Parts Together
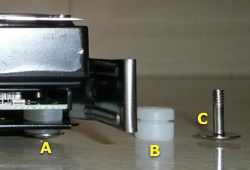
The hard drives are fastened in with screws and nifty silicone grommets that isolate vibration as shown here. The drive (A) floats on top of a silicone grommet. The grommet itself (B) is a little rubbery sponge, and it’s held in suspension with an extended screw (C). Antec includes specific instructions warning the user not to overtighten the screws, because that would negate the advantage of the silicone grommets.
I might be easy to please, but I was tickled pink with this approach. When I turned on the system for the first time, I could definitely tell that the drives were quieter than with a conventional case.

The power supply has a separate chamber at the bottom of the case as shown here. Theoretically, the power supply will draw in its own fresh air from the bottom of the case, where Antec designed a vent covered with a washable filter. The power supply’s hot exhaust air is sent out of the back of the case, and all of its heat is kept away from the rest of the heat-sensitive gear by a metal wall. Cables can be routed up from the power supply chamber through a sliding window, or through the back side of the case under the motherboard.
The CPU, drives and memory generate their own heat, and Antec handles that with a ginormous 240mm fan at the top of the case and a 120mm fan at the back. These fans draw fresh air from the front of the case, through the hard drives, and out the top & back of the case. The fans are huge, but they’re designed to spin slowly, thereby moving a lot of air without making a lot of noise and vibration.
This design works well in combination with the Xigmatek HDT-S1283 CPU heatsink: the Xigmatek ends up aligned with the exhaust fan. I bet I could run without a fan on the Xigmatek at all.
All of this airflow design only works if the airflow isn’t blocked by a mess of cables, so the Antec Mini P180 is designed so that cables are routed through the back side of the case, underneath the motherboard. This area is just deep enough to handle plastic cables like SATA power plugs, but not much more than that. I had to wiggle and squish the cables flat in order to get the doors closed. If you plan on frequently changing motherboards, this is not the case for you.

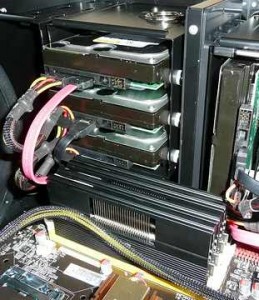
The Antec Mini P180 is a little smaller than conventional noise-reducing cases, so some of my buying decisions came back to haunt me. For example, the GeIL memory sticks have built-in heat sinks and they’re taller than conventional memory sticks. They came perilously close to my hard drives, close enough that I had to reroute the SATA and power cables to get it all to fit. If I were to do the whole thing over again, I might have gone with a full-sized Antec P182 (Antec – Review) to get more wiggle room.
The End Result: A Quiet (not Silent) PC
When I first turned the PC on, I breathed a sigh of relief. I could still hear the fans barely whirring, but when I put the case under my desk, the noise was almost inaudible. The power supply, even though it wasn’t marketed as a quiet model, was still more than good enough.
The Xigmatek’s stock fan was the loudest part of my setup, and I would recommend replacing it with a quieter 120mm fan like I did.
While installing Windows, despite four SATA drives busily scratching away in a RAID 10 config, I could only hear occasional noises – not the loud, steady mechanical seek noises I heard from them in another desktop. The combination of the noise isolating grommets and closed case doors really made a difference. Even with the case doors open, the noise was completely tolerable.
Bottom line: the case, power supply, and CPU heatsink made my fast PC almost as quiet as my relatively slow Macbook Pro. Now if only it ran OSX….


3 Comments. Leave new
This might not be the best time to bring it up, but it is relatively easy to edit fan noise out of an audio signal. A couple of notch filters is usually all it takes. Even something as simple as a graphic equalizer does a pretty good job on it.
Ah, sounds like a good idea. Unfortunately I’m just a SQL Server guy, not an audio guy, so that kind of thing is above my head.
Brief guide on reducing PC noise available here.
http://cyberb1og.blogspot.com/2011/04/how-to-silence-your-pc.html